Eclipse as a remote editor#
Prerequisites#
The user should be familiar with the basic use of the Eclipse IDE.
Eclipse has been installed on the user’s desktop or laptop. We advise to install the bundle ‘Eclipse IDE for Scientific Computing’ of a recent Eclipse release as they contain a lot of other useful tools, including the ‘Remote System Explorer’ used here. This page was tested with the 2019-06 release.
The user should have a VSC account and be able to access it.
Installing additional components#
In order to use Eclipse as a remote editor, you may have to install two extra components: the “Remote System Explorer End-User Runtime” and the “Remote System Explorer User Actions”. Here is how to do this:
From Eclipse’s ‘Help’ menu, select ‘Install New Software…’, the following dialog will appear:
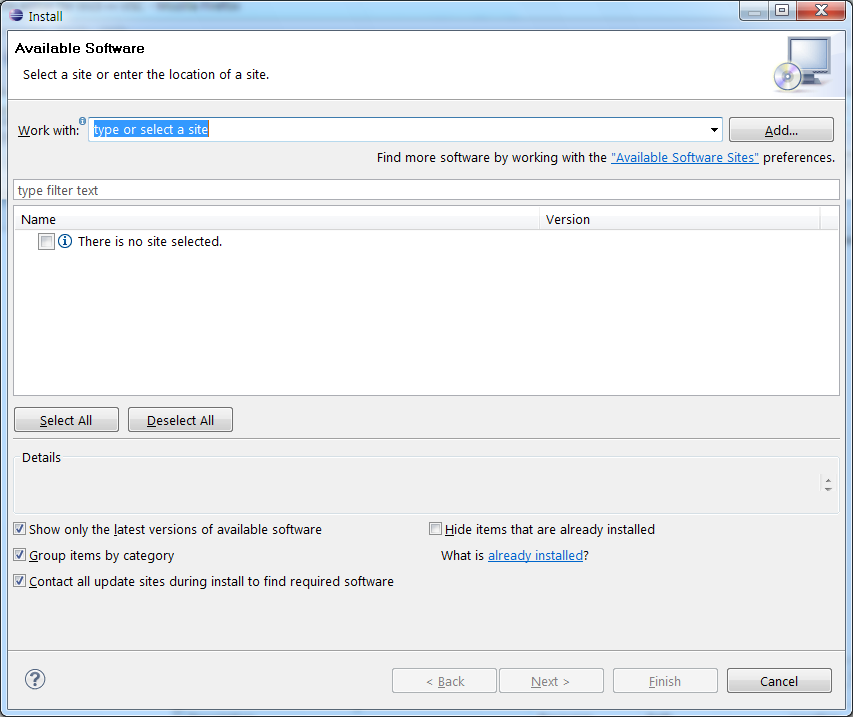
From the ‘Work with:’ drop down menu, select ‘<name> - http://download.eclipse.org/releases/<name>’ (replace “<name>” by the name of the release that you are using, e.g., 2019-06). The list of available components is now automatically populated.
From the category ‘General Purpose Tools’, select ‘Remote System Explorer End-User Runtime’ and ‘Remote System Explorer User Actions’.
Click the ‘Next >’ button to get the installation details.
Click the ‘Next >’ button again to review the licenses.
Select the ‘I accept the terms of the license agreement’ radio button.
Click the ‘Finish’ button to start the download and installation process.
As soon as the installation is complete, you will be prompted to restart Eclipse, do so by clicking the ‘Restart Now’ button.
After restarting, the installation process of the necessary extra components is finished, and they are ready to be configured.
Configuration#
Before the new components can be used, some configuration needs to be done.
Microsoft Windows users who use the PuTTY SSH client software should first prepare a private key for use with Eclipse’s authentication system. Users using the OpenSSH client on Microsoft Windows, Linux or macOS may need to convert their private key to an older format.
Microsoft Windows PuTTY users only#
Eclipse’s SSH components can not handle private keys generated with PuTTY, only OpenSSH compliant private keys. However, PuTTY’s key generator ‘PuTTYgen’ (that was used to generate the public/private key pair in the first place) can be used to convert the PuTTY private key to one that can be used by Eclipse. See “Converting PuTTY keys to OpenSSH format”.
Microsoft Windows PuTTY users should now proceed with the instructions for all users, below.
OpenSSH ssh-keygen users only#
If you are using a recent version of OpenSSH, your private key will not
be compatible with certain modules in Eclipse. Moreover, Eclipse does not
yet fully support ed25519 keys. Keys in the new format start with
the line -----BEGIN OPENSSH PRIVATE KEY-----.
One solution is to generate a new RSA 4096-bit key for use with Eclipse:
$ ssh-keygen -t rsa -b 4096 -m PEM -f ~/.ssh/id_rsa_vsc_PEM
will generate a key and store it in a format compatible with Eclipse. You can then upload your public key as an additional key to the VSC account page using the instructions to add another key on the Access from multiple machines page.
If you have a 4096-bit RSA private key in the wrong format, another option is to simply convert the private key to the PEM format. Assuming your private key file is called ìd_rsa_vsc`, then the conversion can be done using
$ cd ~/.ssh
$ ssh-keygen -e -p -m PEM -f id_rsa_vsc >id_rsa_vsc_PEM
All users#
From the ‘Window’ menu (‘Eclipse’ menu on macOS), select ‘Preferences’.
In the category ‘General’, expand the subcategory ‘Network Connections’ and select ‘SSH2’.
Point Eclipse to the directory where the OpenSSH private key is stored that is used for authentication on the VSC cluster. Next, select your key by clicking the ‘Add Private Key…’ button.
Close the ‘Preferences’ dialog by clicking ‘OK’.
Creating a remote connection#
In order to work on a remote system, a connection should be created first.
From the ‘Window’ menu, select ‘Perspective’, then ‘Open Perspective’ and then ‘Other…’, a dialog like the one below will open (the exact contents depends on the components installed in Eclipse).
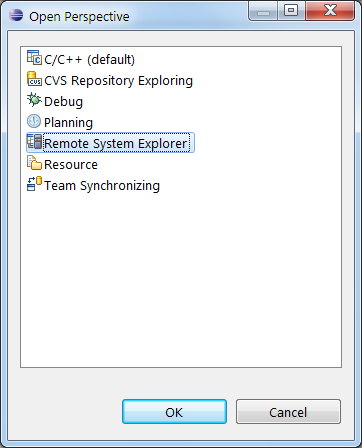
Select ‘Remote System Explorer’ from the list, and press ‘OK’, now the ‘Remote Systems’ view appears (at the left by default).
In that view, right-click and select ‘New’ and then ‘Connection’ from the context menu, the ‘New Connection’ dialog should now appear.
From the ‘System type’ list, select ‘SSH Only’ and press ‘Next >’.
In the ‘Host name’ field, enter vsc.login.node, in the ‘Connection Name’ field, the same host name will appear automatically. The latter can be changed if desired. Optionally, a description can be added as well. Click ‘Next >’ to continue.
In the dialog ‘Sftp Files’ nothing needs to be changed, so just click ‘Next >’.
In the dialog ‘Ssh Shells’ nothing needs to be changed either, so again just click ‘Next >’.
In the dialog ‘Ssh Terminals’ (newer versions of Eclipse) nothing needs to be changed either, click ‘Finish’.
The new connection has now been created successfully. It can now be used.
Browsing the remote file system#
One of the features of Eclipse ‘Remote systems’ component is browsing a remote file system.
In the ‘Remote Systems’ view, expand the ‘Sftp Files’ item under the newly created connection, ‘My Home’ and ‘Root’ will appear.
Expand ‘My Home’, a dialog to enter your password will appear.
First enter your user ID in the ‘User ID’ field, by default this will be your user name on your local desktop or laptop. Change it to your VSC user ID.
Mark the ‘Save user ID’ checkbox so that Eclipse will remember your user ID for this connection.
Click ‘OK’ to proceed, leaving the ‘Password’ field blank.
If the login node is not in your known_hosts file, you will be prompted about the authenticity of vsc.login.node, confirm that you want to continue connecting by clicking ‘Yes’.
If no know_hosts exists, Eclipse will prompt you to create one, confirm this by clicking ‘Yes’.
You will now be prompted to enter the passphrase for your private key, do so and click ‘OK’. ‘My Home’ will now expand and show the contents of your home directory on the VSC cluster.
Any file on the remote file system can now be viewed or edited using Eclipse as if it were a local file.
It may be convenient to also display the content of your data directory (i.e., ‘$VSC_DATA’). This can be accomplished easily by creating a new filter.
Right-click on the ‘Sftp Files’ item in your VSC connection (‘Remote Systems’ view), and select ‘New’ and then ‘Filter…’ from the context menu.
In the ‘Folder’ field, type the path to your data directory (or use ‘Browse…’). If you don’t know where your data directory is located, type ‘echo $VSC_DATA’ on the login’s command line to see its value. Leave all other fields and checkboxes to their default values and press ‘Next >’.
In the field ‘Filter name’, type any name you find convenient, e.g., ‘My Data’. leave the checkbox to its default value and click ‘Finish’.
A new item called ‘My Data’ now appeared under VSC’s ‘Sftp Files’ and can be expanded to see the files in ‘$VSC_DATA’. Obviously, the same can be done for your scratch directory.
Using an Eclipse terminal#
The ‘Remote Systems’ view also allows to open a terminal to the remote connection. This can be used as an alternative to the PuTTY or OpenSSH client and may be convenient for software development (compiling, building and running programs) without leaving the Eclipse IDE.
A new terminal can be launched from the ‘Remote Systems’ view by right-clicking the VSC connection’s ‘Ssh Shells’ item and selecting ‘Launch Terminal’ or ‘Launch…’ (depending on the version of Eclipse). The ‘Terminals’ view will open (bottom of the screen by default).
Connecting/Disconnecting#
Once a connection has been created, it is trivial to connect to it again. To connect to a remote host, right-click on the VSC cluster connection in the ‘Remote Systems’ view, and select ‘Connect’ from the context menu. You may be prompted to provide your private key’s passphrase.
For security reasons, it may be useful to disconnect from the VSC cluster when Eclipse is no longer used to browse or edit files. Although this happens automatically when you exit the Eclipse IDE, you may want to disconnect without leaving the applicaiton.
To disconnect from a remote host, right-click on the VSC cluster connection in the ‘Remote Systems’ view, and select ‘Disconnect’ from the context menu.
Further information#
More information on Eclipse’s capabilities to interact with remote systems can be found in the Eclipse help files that were automatically installed with the respective components. The information can be accessed by selecting ‘Help Contents’ from the ‘Help’ menu, and is available under ‘RSE User Guide’ heading.